Pages

Training the Mind of the Horse and Rider

Training the Mind of the Horse and Rider
Click on Logo (Original artwork by Lanie Frick for Messick Quarter Horses. Not permitted to be copied)
Showing posts with label Teaching. Show all posts

Sunday, July 18, 2010

Teaching the Lope Lesson Part 2

I had a fantastic lesson last week, teaching 2 adults to lope the lesson horses. They did fantastic. Both were apprehensive, a little scared, and tense, but after showing what the horses can do on a lunge line, they both were loping short distances off the line!

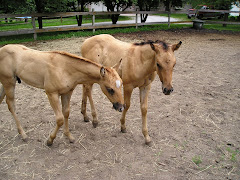
I got on Starlet first, to show how she lopes. I think that helped them a lot to see her lope, as it showed the riders what the horse will do and how the lope on her looks.

After the adult lesson, I had a youth lesson with a youth who has been with me awhile. She has loped a little for the last 2 years, but now at age 11, she was able to put it all together and lope Starlet around the arena a couple of times before stopping. I had a fantastic time with my youth rider too.

Yes, I can't wait to share how I did the lessons and what Centered Riding exercises I used. But what I will really share is the connection between the horse and rider. And the connection between Starlet and I.

The previous post, Teaching the Lope Lesson, Part 1, went through the exercises to get the rider prepared. The exercises did more to relax the rider as much as to “awaken” their joints and muscles. As the riders went through the exercises, they became more comfortable on the lesson horse. They were paying attention to how to do the maneuvers, and they could move the horse where they wanted the horse to go.

The riders started with leg exercises, to open up the hips. I had the riders find their Neutral Pelvis by rocking their pelvis back and forth. We worked on putting our head in alignment through the Building Blocks exercise. This helped the riders to lift their chin a little higher, and able to see further ahead. Using Soft Eyes, the riders could see more of the arena and where they were going to lope their horse. I had them Ground themselves, by feeling their weight into their feet, as if they are standing on the ground. I wanted them to feel the weight through their legs, into their feet, and moving down to the ground and feel like they could sink into the ground, as if they are standing in sand.

We worked on moving the horse with Breathing and using the rider’s Center. The horse needs to be moved with our center, as well as our hands and legs. Think about your center as a small ball moving backwards. If you want to have your horse move out, mentally spin the ball faster. If you need the horse to go slower, spin your center slower. If you need the horse to have a longer stride, spin your center larger. Have your center grow from a golf ball size to a beach ball size, or any size in between. Picturing a certain size ball spinning in your center will help you with your horse’s movement.

We also use our center by spinning in the direction that you want to go. As we prepare for the lope to the left, we want to spin our center forward and to the left.

We lope off with Clear Intent, We need to know, and express to our horse with exact cues, where we want to ride our horse to, at what speed, and knowing what to do if the horse breaks to a trot.

For my lesson horses, they will lope off better for people with these cues: I have the riders hold with light contact on the reins. I have the riders take a deep breath. I have them look in the direction they want to go, and as they breathe out, I have the rider squeeze with their outside heel. Depending on the horse, the leg cue can be soft with Chick or it needs to be firm with Starlet.

If the horse only trots, we stop the horse, take a step back to make sure we have enough control to stop the horse if we need to. Then we ask the horse to lope off with a more exact cue. As the rider looks ahead as he lopes, we continue to add enough leg cue to keep the horse loping.

When we use our Center and give the horse exact cues with Clear Intent, then we can do anything that we want to do. Practice and you can accomplish whatever you want to do.

“Embrace the Journey!”

Thursday, June 3, 2010

A Wonderful Lesson

The next LB (Light Bulb) Moment will have to wait for tomorrow. I just had the most wonderful lesson and I have to share! It is a wonderful feeling, for both me as the instructor and for the rider, when the lesson is wonderful!

The owner of the training horse came to ride. He is a little apprehensive about riding, as he is middle aged and haven’t ridden much at all, even though his wife has horses. He just loves the personality of this horse, though, and he really wants to get along with riding him. He is a motorcycle guy, and he was getting frustrated with trying to ride the horse with horse cues and not in motorcycle mode.

Something clicked with me at the AAHS clinic. Or after starting to read the Centered Riding Book 2 on the flight home from the clinic. Whatever it was, worked! Maybe it was due to the fact that I am still tired from 10 days of traveling, 1 day of being very tired here at home, and another day of deciding how to catch up with all the paperwork. When it came to lesson time, I was ready for a break. So I took things slow!

I walked the horse around as I talked about the Nature of the Horse, explaining why the horse does what he does. Then I had him mount and do a couple of exercises to work on sitting correctly. I had him stand in his stirrups and get the straight line from ear to heel. I talked about your center, and what a Tai Chi ball would feel like in your center, small but heavy. I talked about that ball spinning in our center and our center sinking into our seat. The weight of our seat should continue down into our legs and feet and sink into the ground, as we keep the sensation of feeling grounded. As he rode, I talked about the Following Seat, and had him move with the horse, allowing his hips to move freely. I had him pedal backwards and feel each side of his seat move as the horse walked. As he felt the movement and moved with the horse, the horse’s movement became freer and he moved with a deep stride. As he rode, I had him steer with his body, not just his arms. I told him to think about having flashlight beams coming out of his shoulders, waist and knees, and as he turned the horse, to turn with his body. That worked really well to help him turn the horse. He had a great time riding his horse, and the frustrations that we had a few weeks ago were no longer visible. It was an awesome lesson.

Things just clicked with me, too. I felt like that was the best lesson that I ever gave. I was relaxed and watched the rider and his horse. I gave him practice time after each step that I taught him. I know I need to work on giving the riders time to think things through and practice so that they understand the concept. It seemed to work great today. I look forward to our next lesson. Until then,

“Embrace the Journey!”

Happy Birthday to my oldest brother, Ray! Wished we weren’t so far away. Here’s wishing you many, many more years!

Tuesday, June 1, 2010

Barn Procedures and Lessons Begins


Last week was the AAHS, the American Association of Horsemanship Safety, Clinic at the Calvin Center in Hampton, Georgia. Brenda H is a very knowledgeable instructor. I appreciated how she presented the information and her willingness to listen to other’s opinions. Gretchen was a wonderful host. I enjoyed catching up with her and watching her ride her beautiful horse, Rainbow. I’ve missed seeing Gretchen and having her here to ride Bubba.

We were extremely busy, from early morning until very late at night, some nights to midnight! The material covered under the topics of Safety and Liability was very informative and important to know. Our lives are forever changed. Even though I have always considered safety and liability, now there are more areas to insure that everyone is safe. I will never forget the helmet video, Every Ride Every Time, that I watched. If anyone wants to see it, it is about 10 minutes long and I will always have it in my horse trailer to show. It will forever change your life. Helmets are important and will change lives, forever.

We learned the importance of a Procedures Manual for the barn. Even if you don’t have a riding or training program, I would encourage you to work on procedures for yourself, and for your friends and family who come to your barn and are around your horses. They need to know how to handle the horse safely and correctly, among other areas of care, like feeding, cleaning stalls, watering, and grooming. The Procedures Manual is an easy way for anyone who is there to do chores, or just coming out to ride, to refer to if they have a question about how to do something.

Lessons will always have a Lesson Plan behind them. Since I give lessons, I will work on this area with a lot of detail. But once again, everyone can do a Lesson Plan for them self. Lesson Plans can help you figure out what you want to learn, then work on that area step by step. Having a plan saves on feeling the frustrations that we feel when we start practicing and nothing is coming together correctly. Once we look at an area that we want to work on, then we break the area down into steps. We think about the how to perform each step. We learn each step one at a time, and we don’t go onto the next step until the previous step is learned correctly. That is the key to learning to ride correctly, and teaching your horse! Do not go onto the next step until you have learned the previous step correctly! Look how much easier it will be to learn. Look how less frustrated you and your horse will be. There is no time frame. Take as much time as you and your horse need. You will be amazed at how much more you and your horse will learn in a shorter amount of time! The journey has begun for you!


I wished we had had more horse time and ride time at the clinic!

Terri, Gretchen and I were able to take a short trail ride before the week started.


But there was just enough hours in the day. I think if we had done 1 more thing, we would have dropped by Friday and would have had no energy for the test on Saturday! We did go back to the barn the first night to practice riding, but with reading assignments each night, quizzes each morning, lesson plans to write, and a practice exam to go through, as well as prepare for the exam on the 5th day, we didn’t elect to go back to the barn again. But we definitely needed the practice time.

I did get my CPR/First Aid certification also, which I need for both this AAHA certification and also for Centered Riding. It was only another 1/2 day in the classroom and 2 more tests! I have no brain left. But I am excited to have recertified and someday, may need to help someone. On the plane ride home, I swallowed a Vitamin C drop, whole, and thought, oh no, am I going to choke! Luckily, the drop continued down and I could relax and breathe. Whew!

This week at home is going to be process week. I think I need to time to think. I will apply what I have learned in my lessons. We were taught 9 Secure Seat skills that I will be teaching, as well as the Centered Riding exercises. With the skills taught, you can't help to develop into a balanced rider, with a secure seat and leg. Now it takes practice time.

And it also take observation time. You may think that you are correct, but it takes another’s eyes to see you. If you are lucky to have mirrors in your barn, then you can see yourself, but someone needs to still see how you are flowing with the horse. I feel that I know how to ride well, and that I know horses well and can read them. One comment to me from the instructor was that I appear as if I’m riding for the show pen. She seemed to imply that I don’t know what to do when the horse does something. What? That comment threw me, and as I sat back and listened to her, I thought to myself, “what do people see when they see me ride?” Sure, the camp horses are old, some are stiff, and some don’t give to the bit, but we weren’t there to tune on the horses. If they came off the rail, I took them back to the rail quietly. I used my hands and leg cues, but I didn’t do it with a lot of movement either. To make myself feel better, I thought to myself, “Are my cues so light that no one sees them? Are my cues strong enough? Do I need to show that I am doing more with my body?” “Do I need to show what I am doing?”

I know that I used to ride without much movement, from sitting quietly for the show pen. But that has changed this last year. My joints are freer and my hips move. I allow my body to move with the movement of the horse. I think what happened to me was that I was at this clinic, learning a new way, and forgot about my Centered Riding. I rode and did what the instructor wanted, trying to do it perfect, and went back to my old way of sitting too quiet. I allowed my hips to move in the Following Seat, but I know I didn’t stand in 2 point and allow my knees to be Dancing Knees. This was an important lesson for me. Do not forget to keep moving with your horse. Relax and allow your body to stay centered, no matter what you are asking of you and your horse.

“Embrace the Journey!” I know I have.

Friday, May 21, 2010

Georgia or Bust

I’m packed. I’ve done wash. I have the house organized. I have the honey-do list ready. I’ve gone over chores. I’m tired. I need a vacation.

I leave tomorrow morning at 5 for 9 days in Georgia! I’ll do a group lesson and teach some Centered Riding lessons on Sunday. On Monday, I’ll watch my friend, Terri, work with some of the camp horses.

Tuesday through Saturday is the AAHS clinic. The American Association of Horsemanship Safety clinic. Every teacher can always find a better way to teach. Every teacher can learn.

I’m planning on learning new ways to teach the same safety procedures that I already have in practice. I’m planning on learning new safety measures. I’m planning on learning how to teach a secure seat with AAHS exercises.

Ok, off to bed. I need to get up at 5 am.

Another way to be on my journey. Come along!

“Embrace the Journey!”

Friday, July 3, 2009

Centered Riding Lessons during Week-long Lessons

June, 2009

As soon as I returned home from the Centered Riding Instructors Course in Steamboat Springs, Colorado, I had 2 weeks of weeklong morning lessons with 4-5 youth each day. The weeklong lessons during the summer are different than the regular lessons. I incorporate more games into the summer sessions rather than just teach horsemanship and pleasure like I do during their regular lessons.

Week-long morning sessions are 3 hours long. When the youth first arrive, we tie the horse with a quick release knot, and show them how to safely move around the horses. We never going under the tie rope to cross in front of the horse while the horse is tied. For new riders who haven’t come for lessons before, we show them how to curry and brush, especially checking the top of the back, the withers, and the girth area for dirt. They groom their horses, learning about health and hoof care and safety. The youth learn to saddle, first adjusting the saddle pad, making sure to protect the wither area. They learn the cinch knot, first just snugging up the girth lightly as to not make the horse cinchy and irritated by the girth. After we walk the horse to the arena, we tighten the girth. The riders mount, using a step stool as to not pull the saddle off balance, and we adjust the stirrups.

During the first ride session, I grounded the rider’s feet. I tapped on the bottom of their foot, asking them to tell me when the tap felt a little different on a part of their foot. Some of the youth could tell the difference, some couldn’t. Some felt a little dull, some felt a ting. I asked the ones that couldn’t feel a difference, if their foot felt different in the stirrup. I had hoped that they could feel the “whole foot” be part of the stirrup, not just the toe or middle part of the foot.

We worked on riding in a bubble. I think they liked this the best! I think that they could actually picture an invisible bubble around them (like a gigantic bumble gum bubble or from the jars of bubbles that you blow!). With soft eyes, they walked over and around logs, being careful not to get into anyone else’s bubble. Then we rode in our bubble at the trot. We rode over the logs again and in small circles at the trot. We changed directions while staying in our own bubble.

We worked on trotting and posting and 2 pointing. We worked on sitting the trot and getting the correct diagonal when we started posting. We worked on the correct body position, whether we were sitting the trot, posting or 2 pointing.

As the kids worked on relaxing and breathing, the horses relaxed. Towards the end of the week, we worked on individually working a trail course. The key was to breathe and stay relaxed. Remembering to use soft eyes, looking for the next obstacle.

The kids are having fun and I plan on using more of the Centered Riding Techniques in my lessons with them.

Centered Riding Lesson with Sara

June 13, 2009

I have just completed the first part of the Level 1 Centered Riding Instructors Course. I left Steamboat Springs and headed back to Nunn, CO, via Laramie, Wyoming. Back up and over Rabbit Ears Pass and passing the Continental Divide sign. Eyes straight ahead, not looking over those edges! Especially since I ran into some rain going over the pass!

Sara lives northeast of Fort Collins, CO. She, her husband Jake, and 6 month old daughter Makenzie, live on 8 acres with 3 Quarter Horses, 2 Heelers and 1 German Shorthair, a cat, and many pigeons that they are raising. I traveled with my horse, Finny, and Sara has a round pen that I can keep him in while I visit for a day.

Sara wanted to have me show her what I have been learning. Since having the baby, she hasn’t had as much time as she would have wanted to exercise her horses. She has been riding Peaches and Roz, but she likes to lunge them down first. We had put Makenzie down for a nap, and we decided to use Finny for a lesson with Sara. Sara has a very knowledgeable background with horses. She showed for many years as a youth, studied equine science in college, and was on the college equestrain team as well as the horse judging team. (Her judging team won Congress and placed 2nd at the World Show. What an achievement for her!)

I showed her a few things while we were in the house. I grounded her feet, talked about soft eyes, and breathing deep. I showed her the idea of tipping the pelvis as if a ball was rolling back and forth.

We saddled Finny but I didn’t bridle him as I thought I would only show Sara a few things. We ended up having more time as Makenzie took a long nap! I started from the beginning and grounded Sara’s feet. I wanted her to feel her whole foot in the stirrup. I did a hip release and she could feel the difference. I told her to start out with small changes as her body may not be used to the stretch and we don’t want to make her sore. She had some back trouble since having the baby and recently had gone to the chiropractor. I didn’t want her back to start hurting if we did too many changes too fast.

Sara rode Finny with the lead rope attached to both sides of Finny’s halter. I talked again about riding with Soft Eyes and using your peripheral vision to see all around you. We talked about breathing deep through the abdomen, and exhaling out so that the horse can hear the exhale. As you breathe, so does your horse.

As Sara walked Finny, I showed her how to find her seat bones by rolling her pelvis back and forth. Another exercise is to sit with the legs up on the pommel and slowly lowering them and picking up the stirrups. You can raise and lower one leg at a time if you are uncomfortable putting both legs on the pommel at the same time.

We worked on walking the knees, which is a great exercise to start allowing the body to relax, and allowing the hip, knee, and ankle joints to move and absorb the motion of the horse. Sara said she had some knee discomfort, but after she allowed her whole leg to move with the horse, her knee felt better. I explained to her that when she worked on allowing her joints to move more, her horse will have a better movement. Our relaxation in our joints will allow our horse to relax. The horse will begin stretching his hind leg deeper under his body and will begin to have more freedom in his movement.

Sara needs to work on allowing her body to move, just as I do. The many years of showing horsemanship and being taught to not move is a hard habit to break. Our bodies have a memory too. The easiest way I found to allow the leg joints to move was while I was trotting in 2 point position. Concentrate on being relaxed and allow the knee to take the motion of the horse.

Sara rode at the trot. First, sitting and feeling the motion of the horse in her knees, and trying to see the knees raise and lower as the horse moves. Then moving up to the trot, and while in 2 point, allowing the body to relax. Once you realize that the legs can move and absorb the movement, it becomes easier and easier to relax and feel the motion in the joints. Once you can let the joints take all the movement, you will not have sore legs, knees, ankles, thighs!

Sara was excited to do what she has always done with the horses, but now to ride in a centered, relax style. Even though she is a relaxed rider, and is very comfortable with what she is doing with the horses, she feels like she is even more relaxed and secure in the saddle. She can see how being centered will help her ride reining horses.

And I am excited to have done my first lesson immediately after my Instructors Course! I love teaching what works! I love showing people the techniques and seeing the results in a short time. If you are open to change, then you can change. You just never realize what your body can do until you try!

This is an amazing journey and I am so happy that Sara is along on the journey with me. Makenzie will be, too, as soon as she can sit in a saddle and be safe. Come along on the journey with us!

Tuesday, June 9, 2009

Using Centered Riding with my Lesson kids!

After my weekend of the Centered Riding Clinic, I was able to put my newly learned knowledge to work the following Monday. Three of my teenage lesson kids came for their morning long lesson. They are a great group, and will be my guinea pigs all summer!

I started the morning lesson with teaching about “soft eyes”. The girls found that it was amazing how much they could “see”. One of the girls knew that the arena was tree lined, but she said she never realized that the trees were as tall as they were! Another girl, who has only had 3 lessons with me, said she was much more relaxed. The 3rd girl said that she was more aware of her horse.

We practiced the deep breathing to relax. We rode with “hard eyes” and then “soft eyes” to feel the difference in our breathing, in our focus, and to see how our horses relaxed or tensed. Once the girls rode with more soft eyes, the horses began lowering their necks.

The girls had fun “riding in their bubble”. They each took a turn practicing going over the poles. Then I had 2 girls ride over the poles in their bubble. Then the 3rd girl joined them. As they were comfortable at the walk, they rode the arena, still in their bubble, at the trot. They rode much more confidently.

We rode for an 1 1/2 hours and the time flew by! I asked the girls to keep a journal this summer. I asked them to write about what they did each lesson, how they felt, what was new, and if they had any “ah ha” moments. Moments when the light bulb went on. We will call these “LB” moments!

I asked the girls to share any thoughts that they had. They all agreed that they were much more aware of everything. They felt that they could relax the horses easier. They felt like they were much more relaxed when they rode.

It is amazing how much more aware, of everything, that you are once you start seeing with soft eyes! I think the girls had fun! And I am excited to show them more! Come along on the ride with us!

Saturday, May 30, 2009

Centered Riding Clinic


Centered Riding Clinic, in preparation for the Instructor's Clinic in June and August!

After traveling 3 hours to Carol Wilson’s barn just north of Topeka, Kansas, I got Finny settled in his stall. Temps were in the low 90’s here, so my plans of riding him this afternoon didn’t pan out! Sun was beating down and I was sweating! So I gave him hay and water and told him he was lucky to be relaxing in a stall out of the sun! I registered late for the clinic, so all outside pens were full. Good thing for Finny, being a black horse. Black and sun don’t mix well!

By the time I leveled up the trailer, unhooked, turned Finny out for some stretch time and scooped his stall, it was time to freshen up and get ready for the evening’s seminar. I put Finny back into his stall, changed into fresh, non-smelly socks, and put some deodorant on to mask warm body, changed into clean jeans and a non-sweaty “horsey” top, and I was ready to go. The evening’s event was in the small town’s pizza joint! I ordered a small supreme pizza, without onions and peppers, and went to join the others. And there were free, home-made chocolate and peanut butter brownies! Yummy!!!

Besides being a Level 3 Centered Riding Instructor, Carol is also a Level 2 TTeam Practitioner. Her evening clinic was “7 Easy Exercises to Improve Your Riding”. With Carol’s communication background and her easy going manner and humor, the evening was fun and educational!!! She taught us the 7 exercises, using fun cartoons, with personal experiences, and by volunteer examples.

Carol outline the Center Riding Basics. Soft Eyes. Breathing. Building Blocks. Centering. Grounding. Clear Intent. More on this tomorrow, after the clinic.

She discussed rider issues. Tension. Lack of Body Awareness. Asymmetry. Breathing. Lack of Core Strength. More on this after the clinic also.


We practiced the 7 exercises:

Body Wrap: Ace bandages placed lightly on the body to “hold” the body or part of the body. After an hour, what is the awareness. The volunteer could not balance on 1 foot. After this lightly placed wrap, she sat and rose from a chair with ease, and she easily balanced on each foot!

Neutral Spine. We laid on the floor, with our knees bent and our feet flat on the ground to find that spot were we are centered. We marched in place to find this spot, only raising our knees until they were pointing towards the ceiling. We tip our pelvics back to flatten our backs onto the floor. We rolled our pelvics up to raise our backs off the floor.

Breathing. As we practicing breathing, did we breath shallow and only raised our chest, or did we breathe deep and use our abdomen? With this exercise, we placed our hands on each side of our ribs, then on our stomach to feel our breaths. We then were to breath deep, and move our abdomen up and down. Then we were to take the same deep breaths, but not move the “marble” that was placed on our belly button. This helps to strengthen the core! More on this important topic later!

Hip Control. Carol demonstrated with a volunteer. She raised the leg and held the foot. Someone said it look like she was trying to clean out their feet! Lol Then she relaxed the leg, holding it lightly, and made tiny circles. As the leg loosened and lost tension, the hip became looser. As the person walked after this was completed, they felt like they had a looser, freer moving “gait”! lol Everything is in horse terms!

Shoulder Lift. Carol demonstrated with a volunteer again. She held the arm, just to support it. Then she lightly made tiny circles with the arm until she felt the arm loosen up. As she ran her hand down the arm to the hands, the arm lengthened as it relaxed.

Waiter Exercise. Oh, my! You used your whole body for this exercise. Raise your hand as if you are holding a waiter’s tray. Go ahead, try this one! Now, circle the tray in a complete 360 circle! How are you going to accomplish this? Tricky, huh? It can be done. As you lower your hand forward and down, bend at the knees. Bring your hand back towards your hip and straighten up. Practice both directions.

And lastly, the Tongue Exercise! First we stretched our necks sideways as far as we could, and focus on a point in both directions. Then we looked up and back, remembering how far we could look back. Now, with your tongue, rub the outside and inside of the top teeth. Now rub the outside and inside of the bottom teeth. Now write your name with your tongue. Repeat the neck stretches. You can stretch further, can’t you?

These exercises taught us to be more aware of our body. After we completed the exercises, we reviewed the list of rider issues. With doing these exercises, what rider issues could each of these exercises help with? Each person had different answers, depending on what problems they had when they rode and how they felt that these exercises could help them.


I am here to become a more aware rider. I want to know how my body is affecting my horse and my ride. I want to ride as centered and correctly as possible. I want my horse and I to be a complete team - a team that completes each other!

If you are interested in Centered Riding, check out their website at:
www.centeredriding.org

Come along on this fun, challenging, self-awareness ride with me!

"TRAINING THE MIND OF THE HORSE AND RIDER"

Messick Quarter Horses

Check out my website at: http://www.messickquarterhorses.com/

Lessons, Training and Horse Sales
E-mail me at messickquarterhorses@yahoo.com

Messick Tack & Feed

Messick Tack & Feed
website will be up soon! Click on logo to see current specials!