Pages

Training the Mind of the Horse and Rider

Training the Mind of the Horse and Rider
Click on Logo (Original artwork by Lanie Frick for Messick Quarter Horses. Not permitted to be copied)
Showing posts with label Centered Riding Clinic. Show all posts

Wednesday, May 23, 2012

It's been awhile since I've posted...


 On Shaggy at the FAMDR

Wow, it's been 2 weeks since I blogged!  With the nice weather, I'm outside more.  Conditioning 2 horses on longer miles plus spending time with 3-5 other horses takes up my day, along with paperwork and trying to post clearanced tack store inventory on facebook, which I haven't done much of that the last few weeks either!  I'll blame the weather!

 Views at Turkey Creek

This month has been a busy horsey month.  The first weekend, I went to Turkey Creek, Newcastle, NE to help judge a ACTHA ride.  A friend car and trailer pooled with me.  We both took our gaited horses and we were able to ride Friday evening after settling in, and Sat and Sun afternoons after judging.  We put on about 23 miles.

Covered pavilion at Turkey Creek

The next weekend was the NECTRA clinic, which I'll post what I remember doing.  Now, memory has to kick in! NECTRA is the Nebraska Competitive Trail Ride Associaiton, a division of NATRC,North American Trail Ride Conference.
 
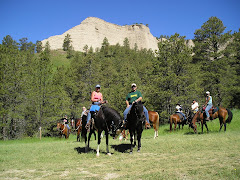
Distance Derby Riders at the FAMDR

Last weekend started on Friday with the FAMDR, the Friday After Mother's Day Ride, which Tammy, horsetrailriders.com, organizes.  I think there were over 100 riders, mostly women.  A few guys ride along as safety riders, but I think they come to enjoy the ride also.  We rode a 14 mile roundtrip stretch on a great trail from Valparaiso to Loma, NE.


This past Saturday a training horse went home.  I showed the owner what the horse was acting like walking around the barns, standing tied, being in the arena by himself.  She had brought her other horse, so we went to Branched Oak Lake, which is about 25 minutes from me, to ride the trails.  The training horse rode great.  He is a 9 year old part Arab, part Paint, and it is just his personality to be a little high strung when he is by himself.  The owner had ponied him as a youngster and worked him a lot, but he just remained goosey at things.  I hope the consistent month has made him calmer for her!

We had some rain Sat evening and night, but even though it dried up on Sun afternoon, hubby and I relaxed some.  We cleaned up some paperwork in the office, froze some of the strawberries that we had picked, and went to a gun show.  Well, he went in to the gun show while I did some internet work.

Lately, I've been posting more on my Messick Quarter Horse Facebook page, about the lessons and events I'm doing.  I'll have to get back to posting more updates here!  I have a Centered Riding clinic here in another week and excited about that.  My level 3 instructor is coming and I have 10 riders!

I've been spending a lot of time riding and enjoying the 2 new Arabs, Allie and Bonita.  Bonita has the sweetest lope.  Allie is starting to pick up speed at the trot and I think she is going to have a ground eating extended trot!

The review of the NECTRA Open Clinic was:

Open Obstacles at CTR Clinic
Clinician Cheri Jeffcoat, Past Open Rider

ON GROUND:

First, we came into the arena without horses to have a question and answer session.  Cheri gave her advice on what she would do at obstacles, preparing for obstacles, nutrition, etc.

Then we came into the arena with only halters and lead ropes on the horses.  Cheri wanted us to rub the horses all over to get them to relax.  A lot of what she said to do during this clinic will transfer to when you ride them.  The 10-15 minutes that we took to rub our horses set us up to have a more relaxing training time with them.

We walked with the horse, stopping, and we waited until the horse stopped.  We worked on leading and stopping from both sides.

We were to back the horse, without turning around.  Stop, walk backwards and have horse back.  We worked on both sides.

We were to walk the horse 1 step at a time.  This sets the horse up to take just 1 step when it is needed on the trail.

We walked over logs, stopping with front feet over 1 log, counting to 5, walk on. We were to lift the horses head and front end by lifting up on the lead rope. This will help the horse to lift his/her feet and not hit the logs.

We worked on having the horse do forehand turns by moving hip both directions, working from both sides.  We did the same with having the horse do pivots, working both sides to move the shoulder.  And we worked on having the horse side pass, working both sides.

ON HORSE:

Now, my memory has to kick in, but I think we did a mixture of walking and stopping, walking 1 step at a time, and stopping and waiting.

We walked and trotted over logs, lifting the horse’s head up as we go over the legs, to help the horse to lift his/her feet. We walked over the first 1 or 2 logs, then stopped and waited over the 3rd log. 

While trotting over logs, we were to be in a 2-point seat position as if we were going uphill.  Our lower legs were to be solid on the horse.  We were to hold with our thigh so our lower legs wouldn’t move.

I can’t remember if we practiced the pivots, forehand turns and sidepass while mounted. 

We did drag a line that was attached to about a dozen plastic jugs.  My horse wanted to see what others were dragging, but he didn’t like to drag it, as he went sideways.

We worked on straddling a log by the length of the log, which the horses wanted to step over it. 

We worked on opening and closing the gate, by asking the horse to back through it.

Everything we do on the ground with the horse transfers to when we ride!
What a great clinic!

Tuesday, April 19, 2011

Centered Riding Clinic Group Lessons Recap

Friday - Sunday, April 8-10, 2011


Each group on the different days of the Centered Riding Clinic, that I attended in Kansas, had slightly different exercises, as well as a slightly different focus, for their lessons.

Topics and exercises we discussed and performed were:

Leg Release and letting go of tension.

Sitting forward on the seat bones, then dropping the spine and back down into the seat. Think of flash lights pointing straight down from Seat Bones.

Posting effortlessly from the Center - allowing the Center to post you.

Following Seat and feeling the movement of the horse. What motion do you feel? Pedal backwards.

Feeling the steps at the walk and trot, and counting the steps the horse took during each breath.

Soft Eyes vs. Hard Eyes. Where is the level of your gaze.

Broken Line through cones, walking and trotting between cones, breathing, and with soft eyes, turning shoulders through turns.

Turning with Center and shoulders - think eyes in front of shoulders. What do your legs do when you turn? Inside knee opens and outside leg comes on the horse.

Center - with a circle inside the Center. How big is your Center?

As horse walks, give and take with reins and have horse stretch and reach down.

Heavy Elbows and follow walk with lower arms and elbows. Our Center is connected to our hands. Our elbows are shock absorbers.

Barber Pole in the corners at the trot, thinking of a V, and stretching out the sides of your rib cage as you post, for a “Diagonal Connection”.

Find Bubbling Spring on foot, and feel grounded in the stirrup.

Walking in Half Seat (2 Point) position with walking the knees and Dancing Knees.

Posting Trot, feeling the weight in the knees, alternating.

Horses mirror our bodies. Where are we tense and where are they tense?

Prepare for down transitions by spinning Center slower and down yet walk with forward motion.

Hip Circle exercise - on the ground, make a circle with the toes.

Building energy in the Center, while keeping the Center low.

Halts, with Center and Breath.

Ride with a Bubble around you, with Soft Eyes and Breathing.

Think Diagonal line from outside shoulder to inside Seat Bones. Notice other diagonal. Which is easier to imagine. Change direction.

Move your Center to move your horse.

2 point over logs.

Clear Intent - want to turn left, think left.

Release when horse stops. Breathe deep into Center, Exhale deep into Seat Bones, ask for the stop, and release.

Relax your jaw by running your tongue around the bottom set of teeth, then upper set, then write your name, in cursive, on the roof of your mouth. The horse relaxes too!

Half Halts, move on to walk or to trot.

Arm stretches while mounted. Opening up chest. Raising shoulders up. Arms overhead and turn palms out to lower arms slowly.

The inside hand feels the rhythm of the walk.

Walk the arena, staying to the outside of the 4 cones that are set in the corners.

Inside ring finger squeezes the rein, prepares the horse, flexes the horse around the turn.

Think of a Carousel Horse pole as you turn a corner.

Alternate leg aids as the horse walks.

Use outside leg muscles and relax inside leg muscles.

Allow Center to rise for a bigger, extended trot.

Lope from your Center.

Allow the knee to drop.

Drive from behind with the Following Seat.

Recycle the Energy from the horse’s front to the horse’s back.

Rider’s Remarks after Group Lessons:

Horse relaxed when everything came together.

Guide the horse better when looking more with the rider shoulder.

Larger walk when there is more energy coming from the Center.

Keeping a trotting tempo. With shorter posting strides, think and post “up”, with quick strides, think “down”, meaning sit deeper on the down part of the post.

Dropping our weight down in our back, picturing the Alligator tail down, stabilizes ourselves in the saddle.

Ground the outside foot.

Feeling grounded and secure.

Using the Center more.

Having a stronger connection to the horse.

Think what you want the horse to do, not what the horse can’t do. Don’t turns into “do this”.

Lift the shoulders up while turning into the corners.

Transitions become smoother as you Center and Grow, lifting up the shoulders and rib cage.

Posting becomes softer with a taller, but relaxed, back.

Remember the pieces of info you want to keep, do the right thing, and stay with it.

Felt a difference in the Following Seat when I dropped my Alligator tail.

Warmed up, thinking of the X, moving from Center up to shoulder during posting.

Monday, April 18, 2011

Centered Riding Clinic Day 3 Group Lesson


By Sunday, the third day of the Centered Riding Clinic, we were reviewing everything, and adding a few more exercises to reinforce what we knew. We worked on Balance, dropping our Center, and lifting up our shoulders.


Something felt different as I dropped my “alligator” tail into the seat. The Following Seat motion seemed to glide. It was a different feeling than ever before, and very smooth.


As we warmed up the horses, I thought about the large X across our front. As I posted, I reminded myself to move up from the hip, through the Center, to the opposite shoulder. As I turned to the right, I made sure to turn with my shoulders more.

I practiced lifting my rib cage and side as I turned, and really stretched up through my sides. I could feel the muscles on each side of my body, between the ribs, as I alternately stretched my sides.  Today’s exercise was all about spiraling our horses down into a circle, then spiraling back out. As we walked the circles, we were to keep our shoulders up and turning with our bodies.


X(1)


X(4) X(2)


X(3)


4 cones were set out in a diamond pattern, and we were to walk a circle on the outside of the cones, then walk to the inside of the cones. Then we slowly walked in a spiral pattern to the center of the circle. We then spiraled out at a walk and once we were to the outside of the cones, we were to turn a 90 degree at cone ,X(1) toward the center of the circle, and walk a straight line from cone 1 to cone 3 and back to line.


We repeated this exercise at a trot. Then we repeated the exercise, but once we spiraled out, we reversed, turning a 180 degree away from the Center, and added a lope departure. The horses were on contact with the bit, as we were spiraling with our Center and shoulders, but still giving some direction with the reins. The lope departure came easier than from the walk or trot.


Each group worked differently, depending on what they needed as riders, and what their horses needed. Some exercises were the same, some were different, and some were a variation of the exercises that other groups had done.

Sunday, April 17, 2011

Centered Riding Clinic Day 2 Group Lesson


Saturday’s group lesson started out with some stretches. We worked on stretching our arms and moving our shoulders. We started by breathing into our Center, with bent heavy elbows, by keeping our elbows bent and our lower arms light. Continuing to breathe into our Center, we dropped our weight into out Center, then into our Seat Bones, then into the Ground.

We did an exercise to release the pressure of a stiff neck and shoulders. Roll your tongue over your bottom teeth, in a circular motion, first on the outside from right to left, then inside from left to right. Then roll your tongue over your top teeth, in a circular motion. Finally, write your name, in cursive, with your tongue on the roof of your mouth? How does your jaw feel? How does your neck feel?

Do you know what happened when I opened my mouth to feel my jaw? Shaggy dropped his neck! He felt the relaxation also!

The group practiced diagonal stretches of the body. To the right, I needed to lift my left shoulder up. When you ride a slow moving horse, you need to think “UP” from the outside hip, to the Center to the inside shoulder. When you ride a fast moving horse, you need to think “DOWN” from the inside shoulder to the Center to the outside hip. Transitions become smoother and the Center becomes deeper.

For me, I had to Center and GROW! I need to sit taller without being stiff. I need to raise my outside left shoulder as I travel to the right.

We worked on our Energy. To move a slow moving horse, think high Energy in your Center, spin your Center fast, breathe out in 3 quick breaths, and go. Add leg when needed.

To Halt, breathe out and let the horse hear the breath! We practiced different transitions, such as walk. then halt. Each “Down” transition, lower the Center and breathe out. Walk, halt, move on instantly. Move up to the trot, halt, walk on or trot on. Add leg when needed.

For the final exercise, we walked 10 steps, lowered our Center, halt with an exhale, then instantly, with a quick breath out, trotted.

I learned that I need to raise myself up, not like an arch in the back, but an
“Up-ness” to the body. I realized that I need to turn more with my shoulders.

I know about muscle memory now. You MAY think you are doing something right, but until you SEE yourself, you won’t believe what someone may tell you. Your brain NEEDS to realize that what you thought was right, isn’t right now, and that you need to do something different.

I encourage everyone to have someone photograph you or video you, as this will make sense if you SEE yourself.

What an eye opener I had this past weekend. I am a good rider. I realized how much more I need to learn.

Saturday, April 9, 2011

Centered Riding Clinic Day 1 Group Lesson


I started off the lesson with leg work. When the legs are relaxed, the pelvis is in position, and the lower back is able to sink down into alignment. The seat becomes deeper and more secure. This is a wonderful feeling.

To ground the outside foot, we did an exercise that isn’t a Centered Riding exercise. We lifted our arms out to the side and did windmills. Turning from the waist, we stretched one arm out front and the other towards the tail, and slowly looked at the tail. Then we changed the arms, bringing the arm that was towards the tail, back towards the head of the horse, and the other arm towards the tail. We looked towards the tail from the other direction, slowly. This helps to stretch out the back and engage the hip joint.

We walked using our “Following Seat”. We worked on spinning our Center, backwards and faster, to move our horses into a longer, freer stride. We added the trot and posted, using only our Center to post. On the corners, we did the “Barber Pole”. We worked on the wrong diagonal and spiraled our posting upwards as we rounded the corners, as well as grounded our outside foot. We squeezed the outside leg as we were sitting, doing this since we were in the wrong diagonal. On the correct diagonal, we maintained the grounded outside foot.

We practiced an exercise to get the correct bend in our horses. 2 cones are in each corner, set at an angle to the corner and far enough away from the corner, so the horse can travel between the 2 cones or on the outside of the cones (between the cones and the arena wall). As you near the corners of the short end of the arena, ride your horse between the first set of cones on a slight bend, then ride your horse on the outside of the 2nd set of cones, asking for a bend to the inside while pushing or keeping the horse to the outside of the cones with your leg.

You may also add some outside rein to help move the horse over, as long as the horse has a bend in his/her body to the inside. Don't pull so much on the outside rein that the horse will look outside, as that will give an incorrect bend and cause the horse to drop the shoulder to the inside. Actually, when you do this, the horse will be in a very slight bend. and the horse will start to frame up. On the straight rail of the long sides of the arena, let go of the horse a little and let him stretch out.

At one point, Carol, the Instructor, told me to not turn with my shoulders so much. This is a habit from looking too far in advance where I am going. I need to look only a little past the corner, so that I don’t have too much turn in my body.

We worked on freeing up the horses and moving them out. I hope Shaggy is ready to move out today. His trot is great. His walk is sluggish, and I need to be able to transfer the energy from my center into his freer walk.

More later tonight after today’s clinic lesson! Have a great day!

Friday, April 8, 2011

Centered Riding Lesson


I'm at a Centered Riding Clinic this weekend, and yesterday afternoon, I had a private lesson. What a great feeling I had when the lesson was over

What a big difference this will make! Post from your Center. To do this, allow
the horse's movement to induce the post. In other words, don't try to post,
just let it happen.

If we're working on the post, then we know how to post. Now, just let the
horse's movement help you to post. And just think about only your center
posting.

I felt like I wasn't posting at all. My instructor, a level 3 CR instructor,
plus a Hunt Seat and Dressage instructor, said the difference was incredible. I
could have posted forever, it was so easy. And as I was letting my center and
the horse's movement do the posting, my horse started stretching out and down
with his neck.

It was so effortless. All I can say is to ride from your center, think about
your center as you are walking, trotting, posting, cantering, loping. Don't
overdo any motions. Just ALLOW them to happen!

and have fun while you figure this all out. remember, this is a journey! and
it takes a lifetime!

Yesterday's lesson should me, even more, that I need to breathe out and let go of the stressors of the day. This is just not a deep breath or two, this is a total relaxation of the body during the deep breaths.

I don't bring "life's moments" to my riding anymore. But the tensions may still be there. Yesterday, Carol did some leg work on me, while I was in the saddle, and it felt wonderfully to feel the legs totally relax, and "let go". It's hard to explain, but it's like a total emptying of anything tight within my legs, or in the body when you work on the body. It felt wonderful to feel the total relaxation. I could have gone to sleep, and that was just a minute of "hands on" relaxing ONE leg.

Later, when she did a little bit of pelvic work with me, and shifted my pelvis forward 1/8", even less, she had me release down into my lower back. She had me feel like I had an "aligator tail" at the end of my pelvis, and to drop that tail into the saddle, and into the ground. What a difference. I did feel very grounded. But I felt like I was on the front of my pelvic bones too much and I also felt "heavy in the cantle", which we don't want for CTR. Carol said that that was because it's our body's memory, which I know, and that the right thing may feel wrong until our body gets used to it. How right she is.

For example, you feel straight in the saddle, but looking in the mirror, you can tell you're leaning forward or backward. You feel right, but you are seeing yourself, and you're not straight. It will take time to have the right stuff feel right, when we have years of doing it wrong. We need to reteach muscle memory that right is RIGHT!

I'm off to my first day of Clinic. later...

"Embrace the Journey!" I'm wearing my bracelet today that has that quote on it!

B

Friday, December 3, 2010

Finny Baby Pics


Finny, 1 month,


then he was orphaned. The mare died of colic at the breeders. Older mother, stress at breeding, young colt.


Finny grew into a little yearling,


my little guy grew into a 15.3 handsome fella.


7 years later, he was gone. But not without lots of memories.


I just love my smile in this photo!

Thursday, June 24, 2010

Shaggy in Colorado

The Centered Riding Update Clinic. Enjoy the pics!


Our Centered Riding Clinic in Steamboat Springs, CO. Beautiful country!


Shaggy in the outdoor arena. Memories of Finny in the same arena come flooding back.


Shaggy is so quiet at the clinic. It is amazing. This is the first time that he has been off the place.


What an arena! Dressage barn with mirrors! But what makes it wonderful is the people! Regina is the perfect hostess. What I love about her is how much she is willing to share, and how much she wants to!


Danicng Knees, but I could have had them bent more,


Sitting the trot down the rail,


Relaxed,


Arena of my dreams!


Bending very nice!


Collecting at the trot,


Trot to Walking transitions,


Posting Trot, and showing off some muscle,


Bending in a Figure 8 Circle,


and finally, the lope departure,

Sunday, June 20, 2010

Centered Riding Update Clinic Day 4

June 17, 2010

Day 4 was the last day of the Update Clinic. With all the preparation work for the canter, today was canter day. Shaggy needs to be able to pick up the canter without trying to trot faster and faster, and falling into the lope.

We did cavelletti work. We walked and trotted over 3 logs laying on the ground from both directions. Then we raised the logs by sitting them on another log and placing them about 4 ½ feet apart. We trotted these logs, asking the horse first to extend the trot. Then the logs were put closer together, and we worked on going over the logs in a collective trot.

Building on the previous day, we worked on the walk to trot to walk transitions. The horses needed to move out to the trot on the first stride. Two logs were placed together on an angle on one of the corners. As the horses trotted up to the logs, we were to ask for the canter right before the horse took the stride to go over the log. Shaggy spooked as her neared the logs for the first time at the trot, so we walked up to and over them in both directions. We trotted the log first, then at the next trot time, we asked for the canter. We were successful in getting both canter leads.

I had Susan sign my Centered Riding book. She is a gifted artist. Along with signing my book, she drew a picture of me riding Shaggy. What a wonderful memory.

I spent Friday evening through Saturday noon with the 2 grandbabies. Jacob, Amber and Caden came out to visit while I was there. The 2 little ones hadn’t seen each other since Christmas. I had a fabulous time. Makenzie and Caden got to ride her “Pody”. I’ll post Pony and Play time photos soon.

Thursday, June 17, 2010

Centered Riding Update Clinic Day 3

June 16, 2010

Day 3 was preparation for the canter or lope. This is the point of where I am at in Shaggy’s training. We continue with the walk-trot-walk transitions. Building on transitional work is the key to moving towards higher levels of maneuvers.

Walk to Trot and back to Walk transitions prepares the horse to move out. This causes the horse to start thinking about when the transition is coming. We work the body and the mind of the horse by varying transitions. We move from the walk to the trot within a few walk steps. Trot, come back to the walk for 2 walk steps, and trot again.

We can also move the horse out by thinking about and by moving our center while we pedal backwards in the Following Seat. If we want the horse to move out more briskly, we want that center to grow and spin larger. We grow up and that helps the horse to stay light in the front end also. If we want the horse to move slower, we spin our center smaller and slower.

Through a lot of transitions into the trot and back to the walk and stop, the horse becomes lighter on the front end. The horse becomes springier in the trot. The lope departure becomes easier as the horse becomes lighter on his front end, deepens his hind end motion, and springs into the lope.

We don’t ask for the lope until walk trot transitions come easily, and the horse springs into the trot. We vary the asking by increasing or decreasing the number of steps between the walk and trot. We add maneuvers and patterns to the work out, keeping the horse always thinking.

The last day of the clinic should be about building on the lope departure. The fourth day is here already. It is exciting when time flies like this and we have so much fun while learning!

“Embrace the Journey!”

Tuesday, June 15, 2010

Centered Riding Update Clinic Day 2

Can you believe that it is the middle of June already? Summer is here now, as it is sunny 70 in CO at my clinic. I had my trailer windows open as I made supper, and even now as I’m enjoying a cup of coffee while I blog. Shaggy is eating some hay, and I will go check him and clean his stall in a little bit, but first I want to share about my day.

I am having such a good time here. Relaxed. No pressure to meet any guidelines or to pass any level. This is a time to learn more, apply what we are learning and go home with more “tools in the toolbox.” We are learning a few more Centered Riding techniques and exercises. We are applying what we are learning in 2 ways. First we teach a 45 minute class to 1 or 2 students, instructing them with any Centered Riding basic and exercises that we think will help the students that we have. Then after the teaching sessions, we ride. Today was an 1 ½ hour instruction by Susan, a Level 4 Centered Riding instructor.

I asked Susan how she knows something is enough when she does body work or is having the rider do something. She said to me that just her years of experience have given her a precision of knowing what to do and when. And it shows. She can see what is happening with a horse or with the rider, and she knows exactly what to say to the rider to see an improvement in the rider/horse relationship.

I am so glad that I came with Shaggy. He is being excellent! I can tell that we are improving in our relationship. He is starting to feel my body movements and to know what they mean. As I do the “Following Seat“, he moves in a deeper stride. If I half halt, he hesitates. We half halted to the stop and he began to stop. He is moving off my legs, without spurs which I have never used with him, and he is staying straighter down the long side of the arena.

Shaggy has definitely deepened his stride with 4 exercises that helped to get the horse’s back up. First, using the “Following Seat” and other exercises, his legs reach under him as I follow his movement with my hips, allowing him to be freer through his shoulders and his body. He is staying light and lifting his shoulders. This is happening because I am riding with my center and moving my hips freely as he moves.

Second, in the “Posting Trot“, we use our outside leg back and deepen our heel at the down movement of the trot, which is when we sit the trot. We move into the “3 Seats at the Trot”. We post 6 strides, 2-point 6 strides and sit 6 strides, then repeat the sequence. When we 2 point, we do the “Dancing Knees” exercise, allowing the hip, knee and ankle joints to relax and feel the movement of the trot. When we sit, we sit with control. We sit lightly into the saddle by first starting to sit, then opening up our knee which takes our knee off the horses and then sit. By doing the sit part of the 3 Seats at the Trot lightly, we are able to sit the trot without hurting the horse’s back with bouncing.

Lastly, we did Half Halts at the walk to stop the horse. We think about our Center and having our center deep. Then we grow with the horse, but we don’t think about growing up. Think about growing down, like the roots of a tree. Another way to Half Halt to the stop is to bring our center down, then think of letting go of a balloon from our head. Don’t allow the body to straighten too much, just think lightness. We finished the exercises by asking for a stop at the trot by using the Half Halt.

I was almost ready to lope Shaggy as his movements were beautiful. He was giving to the bit. At the end of our lesson time, I could tell that he was tired though. He did want to grab at the bit. I asked him to continue to stay straighter going down the rail and moved his ribcage back over to the rail when he wanted to come off the rail. I wanted to end on a good note, and I didn’t want to move him into the canter, which seemed like it would have been effortless, if I didn’t have time to correct anything that went wrong.

I did turn Shaggy out in the outdoor arena while the next group had their lesson. I brought him in at the end of the day for some hay and water. I saddled him, put him into a D ring snaffle instead of the short shank, broken mouthpiece, (which has a covered hinge), that I had been riding in. I knew tomorrow it was time to take my Centered Riding exercises and apply them to the lope. What better way to improve his lope than when I am being instructed by a very knowledgeable Centered Riding instructor.

I warmed Shaggy up with some walking, using the Following Seat. I trotted him, both while posting and while 2 pointing. I practiced the half halt stops at both the walk and trot. When I felt that he was relaxed, and half halted him, I asked for the lope with my center. I maintained light contact on his mouth, mainly for speed control at first. But I left go of contact as I wanted Shaggy to know that it was ok to lope freely with a rider. Using half of the arena, after 2 or 3 circles, he settled down into a nice lope speed. I stopped, reversed, and went to the right, which is harder for him to stay in the lope. This was also the direction that he would come off the rail at the trot. I asked for the lope and I left him go faster. At home, I had trouble keeping him in the lope, so I wanted him to lope at the speed that he is comfortable. I stopped him, then went right into a free moving walk, using the Following Seat. This way, he knew that loping could end and be relaxing!

I know at times I hold too lightly on the reins for contact. I have control, but I need to tell my horses to move back into straightness sooner and with more exact pressure when they don’t stay straight. That is what I am taking away from today’s lesson.

The lesson felt good. After an in depth lesson like this, I have never re-saddled my horse to ride again. Today, I couldn’t wait to get back on Shaggy and practice a little. I want to prepare both him and myself for tomorrow. We both can be relaxed going into the lope transitions.

What a journey this is starting to be. As I have started this journey a year ago, it is still new and fresh for me. Now I am starting a fairly young horse and teaching him correctness and straightness. Shaggy and I are both starting together at the same level.

I will “Embrace the Journey!” with him.

Monday, June 14, 2010

Centered Riding Update Clinic

Day 1

Another June finds me in Steamboat Springs, Colorado for a Centered Riding Clinic. Last year, I was here in June and in August, completing my Level 1 Instructor’s Course with Peggy Brown. This Update Clinic is instructed by Susan Harris. This is 1 of 2 Update Clinics that I will need before August of next year to be able to apply for Level 2 Centered Riding Instructor.

Last year, I had Finny here. I still miss here dearly, and I will always miss “what could have been“. I was so looking forward to where Centered Riding could have taken Finny and I towards a wonderful partnership. We had bonded so well during those summer months of last year, when I started my Centered Riding journey. He was riding beautifully and I was having so much fun with him.

This year, I have Shaggy here. I have raised Shaggy, and from the time we was a weanling, I have always admired his conformation and looks. He has a gentle soul. Things happen for a reason, and God has shown me that I can have another special relationship with another horse. Shaggy’s quiet way of going is what I needed. My Centered Riding journey will continue with him, as I’m sure that there will be many horses in my life that will help me on this journey. I pray that I am able to bring Shaggy to where I had Finny. This sadness that I have with losing Finny will go away some day. I’m hoping Shaggy helps me with that feeling.

I have made mistakes already with Shaggy this past month. One is simple. I got impatient and got after him one day for not picking up his hind feet for me. Now he is scared to pick up his feet. I should have relaxed and did some breathing, but that is what I am doing now. Today he picked up his feet, even though he moved right away. That’s ok, as there is no pressure to do it correct right now. I just don’t him scared to pick up his feet.

The other mistake is taking him into the lope before he was ready to carry me into that lope in a good frame. He is 7 and I wanted him going now. Or so I thought. I don’t need him loping, and loping with collection, by a set date. I don’t need him becoming anxious because I want him to lope. Today, we worked on walk trot transitions and breathing through those transitions. At the beginning of the lesson, Shaggy went from being relaxed and having a level head at the walk to stiff and high headed with being asked to trot. By the end of the hour lesson, he walked and trotted into transitions with a level head. And I have learned that I need to keep him at these transitions until he is comfortable with any walk trot transitions.

During this lesson time with 2 other riders, we worked on the Following Seat, which had us feeling the horse’s movement at the walk. Allowing the hips to move, we were to see if we could feel the front and back movement of the walk, which was easy to do. We were to see if we felt the side to side motion, which I finally “got” recently. At home as I practiced the Backwards Pedaling, I could feel each side of the seat bones moved, first one side pedaled backwards, than the other side. During the lesson, we were to see if we could feel the up and down movement. I didn’t feel that movement.

To feel the front and back movement, we were to picture a large ball moving in our center. This is the Backwards Pedaling motion. We were to picture a watermelon laying on its side for the side to side movement, and take the shape of that watermelon as we pedaled backwards. Then we were to picture that watermelon standing on end, pedaling backwards but up, as in the shape of that watermelon. As the front foot left the ground, you felt the up movement. I got it!

And with the up movement, as I was visualizing that watermelon standing upright, I grew taller. And my horse became lighter on his front end! Light Bulb Moment! His walk was fantastic. He was striding out, relaxed, level headed, AND light on his front end, all with me seeming taller, yet relaxed also.

We had some body work done during the lesson. I had a hip release done, which I love. The hips become more open and the legs seems longer. Once again, the muscles become relaxed and appear longer. Susan showed us a way to move the lower leg in small slow circles which freed up the hip more. She showed us a technique of brushing the lower back, 3 times, then coming over the thigh, ending in a hip release and grounding of the foot. Another thing that I realized was the amount of pressure that Susan used. It wasn’t heavy or hard, but her hand had a certain amount of distinct pressure to it. It was more exact pressure. She explained that after years of experience, she knew the feel. It was clear intent.

Amazing how that felt. I’m not explaining it well, but after I process this and experiment with other riders, I will want to start to develop this feel.

To me, riding horses is a feel. I love passing this feel along to others. I want to develop my feel so that in an instant, riders know that they have been touched by something new and wonderful. Something that will touch their lives and empower their time with horses. I love what Centered Riding is teaching me and how it is affecting my life.

Enjoy your journey, wherever is now and wherever it is taking you. And always,

“Embrace the Journey!”

Wednesday, May 12, 2010

Centered Riding Topic: Dancing Knees

On the Horses Are Our Lives Chat Group, I talked about Dancing Knees.

I love this Centered Riding exercise. As you are trotting, go up into 2 point position. You will be 2 pointing with relaxed knees, allowing the knees to move with the movement of the trotting. As you are relaxing the knees and going with the movement, you will soon realize that your ankles and your hips are more relaxed. You will be able to ride longer periods of time without any joint pain or tiredness or achy knees.
Let me know how it works for you and have fun with this exercise!

At first, you can have a lot of movement. I had asked this very same question! "ALLOW" your body to move with the horse. When you get comfortable with the exercise, your body starts to do the movement in the knees without effort from you making the body move. This may take months. The key is to allow the body to move, then slowly don't help the body to move. I left my body move all last summer, for 3 months, then slowly started moving less. I am going to an update clinic in June, and I will let everyone know if my movement is too much at this point, a year later.

Saturday, May 30, 2009

Centered Riding Clinic, Day 2 and Day 3


Day 2. Carol teaches so relaxed and so effortlessly! I am loving her as an instructor!

12 riders were split into 5 groups, with each group riding for an hour. I was lucky enough to pull the last group! 3:45 - 4:45 in 90 degrees! Luckily, the indoor arena was a spacious 70 x 140’, with an additional 20’ on the end for seating. Sliding doors acted like large windows on the sides, allowing for a cross breeze. It was actually very pleasant in the arena!

Most of the riders were not new to riding, but did not have a lot of Centered Riding experience either. Some were intimidated by their horse’s fast gait. Some were trying to find their balance at the trot and lope. Some were on sensitive horses who felt their riders tension.

The first group was taught where to sit and to find their balanced seat by tipping their pelvis to find their center. To relax the horse, the riders were told to yawn, which in turn, made their horse “yawn” and slow down. The group worked on “S” turns, which helps to relax the horse, which in turn allows the horse to breathe. A horse can’t turn easily if he is stiff. The riders were taught to turn from their center by using their belly button as a guide.

To send the horse off into the trot, the riders took a deep breath and blew out loudly, pushing the air out with a puff, adding their legs when necessary to get the desired gait. By focusing on the center, and spinning a ball in your center, you make the horse aware that you are asking for a faster gait. To slow down, the rider sat, breathed out and down to ask for the stop. With a soft eye, the riders guided their horses through cones, turning with their center. A soft eye allows the rider to be more aware of what is going on around him.

The “Bubble and Spring” is the place where the foot goes on the stirrup. With the foot properly placed, you allow the horse to be a freer mover. You can absorb motion through the ankle, knee, and hip. Breathing relaxes the horse and rider. Soft eyes keep the rider from getting stiff. All of this works together to keep the horse from getting too stiff.

The 2nd group worked on thinking tall and relax the rider’s shoulders. They worked on contact on the reins with their tricep muscles, keeping a bend in the elbow and keeping the elbow elastic and soft. Stirrups were shorten after Carol rotated the hip joint and lengthened the leg. The body was to be a “clothesline”, stretching outwards with the shoulder and allowing the body to move freer.

When a horse has a big trot, try bouncing on the down of the trot. Ride the horse with the outside of the leg. This frees up the horse to move and releases the rider’s thigh. With soft eyes, walk in a “bubble” with clear intent of where you are going. This causes the horse to remain in focus with the rider. The riders practiced going through 2 cones set on a diagonal in the corner, first going between the cones, then riding on the outside of the cones. With this focus, the riders worked on their intent of where they wanted the horses to go.

These riders learned to remain relax to stay centered. They were to stay in the middle of the horse’s ride, with their chest up. The bubble exercise helped to channel the horse’s energy.

The 3rd group worked on allowing movement in the seat. They were to feel the front to back and side to side movement. As they felt their seat bones, they were to feel first one side then the other side. To become more aware of their seat bones, they thought of peddling a bike backwards. The faster you peddle, the faster the movement of the horse. The slower you peddle, the slower the horse’s movement. As the body relaxes, the body and hip moves front to back. They worked on circling cones, keeping their eyes up and looking around the circle. The riders worked on having less tension in the legs, by feeling the feet on the bottom of the boot. As they halted, they were to breath into their center, breathing down.

The riders learned to soften their own back to help lengthen the horse’s stride. The riders worked on relaxing their whole leg, from their hip, down their leg, to their foot.

Group 4 worked on the same techniques as the above groups. They worked on cone exercises, with soft eyes to weave the cones. They grew more confident as they worked their horses through the cones and circled the cones, and as they forget about their tension.

I was in the last group with 2 other riders. We each wanted to make sure that we sat as centered as possible. Carol made subtle adjustments, some only ¼”, to how we sat, to help lengthen our body and legs. She worked on freeing our hips and relaxing our legs. With me, she worked on my hip joint to allow it to open more, allowing the upper leg to sit higher, yet maintaining the knee bend. As we first walked, she wanted us to feel ouir knees. Could we feel them move up and down as the horse walked. We trotted, with a hand on our knee to feel the upward and downward movement of the knee.

We rode at the 2 point, finding our deep center. As we lowered our body into the saddle as we sat, barely touching the saddle, we concentrated on what our knees were doing. We worked on an exercise: posting, 2-pointing, sitting the trot. As we worked on the lope, using our center to stay grounded, we found the place were we were relaxed.

Pictures to come soon, I promise,. 11:30 and I am tired. Early day tomorrow. I ride at 7! Night!

May 21, 2009

Day 3

The day was forecasted to be hot. Our group volunteered to go first. That was great. I would rather ride in the cool 60’s morning than a 90 degree afternoon, even if I was riding an hour earlier than the day was scheduled to start. But no one told us that we were going to have thunder and a storm in the area during the night, awakening me at 3 am! I never sleep good when I am away - too excited for the following day, I guess. So I am wide awake at 10 pm, and 11 pm, and finally went to bed before midnight. Awaken with the thunder, maybe some hail, at 3 am, so I went outside - and no one else was outside - and shut trailer windows. Then back to bed, shutting trailer windows. Listening to the thunder and wondering if we were getting the storm. I actually went back to sleep without knowing if it was raining, and that darn alarm woke me at 6 am out of a deep sleep! Wouldn’t you know it!

Our ride time was great! Have I said how much I am loving Carol Wilson as an instructor! She is so positive, supportive, and with a unique humor! She has many years, no decades, of balanced riding techniques and she teaches well with an educated eye! I just love her coaching!!!

We started the morning ride session with some stretches, since I and another rider was stiff through the pectoral (chest) muscle area from yesterday’s ride session. With the up and outward stretch of the muscles while we rode, it was enough to stretch them to tightness today. I felt some relieve from the tightness after the stretches!

I was in the arena about 10 minutes early, and long trotted Finny down. As we started the session, Finny was more relaxed than the previous day. Poles were laid in a pattern in the arena,. We were told to ride in our “bubble”, using the whole arena to ride with “soft eyes” and “intent”. We could walk or trot, and go around or over the poles.

We were to ride “centered” and turn with our “center”. We could use a little inside rein when necessary to help the horse to look where he was going. When you ride with soft eyes, AND breathe, the horse is so much more relaxed. Remember to spin the ball in the center to have your horse move out freely. Remember to back peddle to slow your horse down and stop.

We fine tuned today! The group, per the instructor, told us that we were sponges and soaked up the information. Maybe a little alpha! Lol

We trotted one at a time, crossed the arena on the diagonal, and loped off in the opposite direction. The transitions were smoother when the rider used soft eyes, raised up and widen through the chest, and looked around the corners.

My group was well matched. We all worked on sitting the long trot and posting the trot, using our center. We wanted to have smooth lope departures, using our center to lope. This is a concept that I will work on, as I always have “pushed” the horse into a lope with my outside leg, asking for a forehand step before the lope departure.


We practiced holding the reins correctly, with the hands turned up, the pinky finger on the outside of the rein, and the thumb on TOP of the rein. With on a slight tightening of the rein, you should be able to turn the horse. Ask to see the horse’s eye first, before making the turn.

Remember, Centered Riding Simplifies Riding!!! Don’t get “hard eyes” “inward”. Don’t concentrate so much that you forget what you are working on.

Ride with SOFT EYES. BREATHE. Find your BUILDING BLOCKS to set up your CENTER. GROU ND with your feet, with even pressure on your stirrup. Ride with CLEAR INTENT.

I’m excited to change my focus and am looking forward to this journey!!! Come along on this fascinating ride with me!!! Remember, Centered Riding is a Process! Relax and take your time getting there!

Centered Riding Clinic


Centered Riding Clinic, in preparation for the Instructor's Clinic in June and August!

After traveling 3 hours to Carol Wilson’s barn just north of Topeka, Kansas, I got Finny settled in his stall. Temps were in the low 90’s here, so my plans of riding him this afternoon didn’t pan out! Sun was beating down and I was sweating! So I gave him hay and water and told him he was lucky to be relaxing in a stall out of the sun! I registered late for the clinic, so all outside pens were full. Good thing for Finny, being a black horse. Black and sun don’t mix well!

By the time I leveled up the trailer, unhooked, turned Finny out for some stretch time and scooped his stall, it was time to freshen up and get ready for the evening’s seminar. I put Finny back into his stall, changed into fresh, non-smelly socks, and put some deodorant on to mask warm body, changed into clean jeans and a non-sweaty “horsey” top, and I was ready to go. The evening’s event was in the small town’s pizza joint! I ordered a small supreme pizza, without onions and peppers, and went to join the others. And there were free, home-made chocolate and peanut butter brownies! Yummy!!!

Besides being a Level 3 Centered Riding Instructor, Carol is also a Level 2 TTeam Practitioner. Her evening clinic was “7 Easy Exercises to Improve Your Riding”. With Carol’s communication background and her easy going manner and humor, the evening was fun and educational!!! She taught us the 7 exercises, using fun cartoons, with personal experiences, and by volunteer examples.

Carol outline the Center Riding Basics. Soft Eyes. Breathing. Building Blocks. Centering. Grounding. Clear Intent. More on this tomorrow, after the clinic.

She discussed rider issues. Tension. Lack of Body Awareness. Asymmetry. Breathing. Lack of Core Strength. More on this after the clinic also.


We practiced the 7 exercises:

Body Wrap: Ace bandages placed lightly on the body to “hold” the body or part of the body. After an hour, what is the awareness. The volunteer could not balance on 1 foot. After this lightly placed wrap, she sat and rose from a chair with ease, and she easily balanced on each foot!

Neutral Spine. We laid on the floor, with our knees bent and our feet flat on the ground to find that spot were we are centered. We marched in place to find this spot, only raising our knees until they were pointing towards the ceiling. We tip our pelvics back to flatten our backs onto the floor. We rolled our pelvics up to raise our backs off the floor.

Breathing. As we practicing breathing, did we breath shallow and only raised our chest, or did we breathe deep and use our abdomen? With this exercise, we placed our hands on each side of our ribs, then on our stomach to feel our breaths. We then were to breath deep, and move our abdomen up and down. Then we were to take the same deep breaths, but not move the “marble” that was placed on our belly button. This helps to strengthen the core! More on this important topic later!

Hip Control. Carol demonstrated with a volunteer. She raised the leg and held the foot. Someone said it look like she was trying to clean out their feet! Lol Then she relaxed the leg, holding it lightly, and made tiny circles. As the leg loosened and lost tension, the hip became looser. As the person walked after this was completed, they felt like they had a looser, freer moving “gait”! lol Everything is in horse terms!

Shoulder Lift. Carol demonstrated with a volunteer again. She held the arm, just to support it. Then she lightly made tiny circles with the arm until she felt the arm loosen up. As she ran her hand down the arm to the hands, the arm lengthened as it relaxed.

Waiter Exercise. Oh, my! You used your whole body for this exercise. Raise your hand as if you are holding a waiter’s tray. Go ahead, try this one! Now, circle the tray in a complete 360 circle! How are you going to accomplish this? Tricky, huh? It can be done. As you lower your hand forward and down, bend at the knees. Bring your hand back towards your hip and straighten up. Practice both directions.

And lastly, the Tongue Exercise! First we stretched our necks sideways as far as we could, and focus on a point in both directions. Then we looked up and back, remembering how far we could look back. Now, with your tongue, rub the outside and inside of the top teeth. Now rub the outside and inside of the bottom teeth. Now write your name with your tongue. Repeat the neck stretches. You can stretch further, can’t you?

These exercises taught us to be more aware of our body. After we completed the exercises, we reviewed the list of rider issues. With doing these exercises, what rider issues could each of these exercises help with? Each person had different answers, depending on what problems they had when they rode and how they felt that these exercises could help them.


I am here to become a more aware rider. I want to know how my body is affecting my horse and my ride. I want to ride as centered and correctly as possible. I want my horse and I to be a complete team - a team that completes each other!

If you are interested in Centered Riding, check out their website at:
www.centeredriding.org

Come along on this fun, challenging, self-awareness ride with me!

"TRAINING THE MIND OF THE HORSE AND RIDER"

Messick Quarter Horses

Check out my website at: http://www.messickquarterhorses.com/

Lessons, Training and Horse Sales
E-mail me at messickquarterhorses@yahoo.com

Messick Tack & Feed

Messick Tack & Feed
website will be up soon! Click on logo to see current specials!